
Fitting both an On-Board Unit (OBU) slim mount and a mobile phone holder onto a single center console requires careful spatial planning, surface preparation, and a clear understanding of your vehicle’s layout. The key to a successful installation lies in positioning the OBU slim mount on a flat, unobstructed section of the console while utilizing a complementary mounting style—such as an air vent clip, adhesive base, or cup holder mount—for your phone. By mapping out your console’s active zones and ensuring neither device interferes with the other’s visibility or physical clearance, you can achieve a clean, functional, and safe cabin environment.
When planning this dual-device setup, you must balance convenience with strict safety standards. A poorly placed mount can block critical controls, obscure your view of the road, or even interfere with safety systems like airbags. Taking the time to measure your console space, select compatible mounting accessories, and follow proper installation techniques will prevent damage to your vehicle’s interior and ensure that both devices remain securely in place during your daily commute.
Evaluating Center Console Space and Safety Boundaries
Before attaching any mounts to your center console, you must thoroughly evaluate the available layout and identify restricted zones. The most critical safety consideration is the location of your vehicle’s airbag deployment zones. Airbags deploy with extreme force, and placing any hard plastic mount, device, or cable in their path can turn these items into dangerous projectiles during a collision. Consult your vehicle’s owner’s manual to locate all passenger, knee, and side-curtain airbag deployment zones, and ensure your planned mounting locations are completely clear of these areas.
Products mentioned in this guide
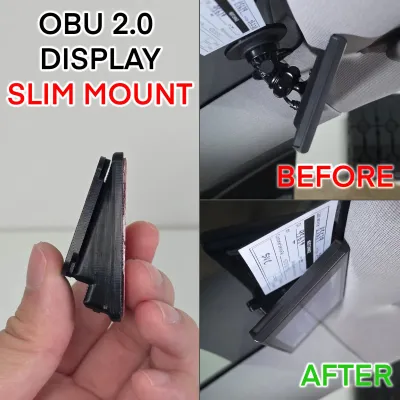
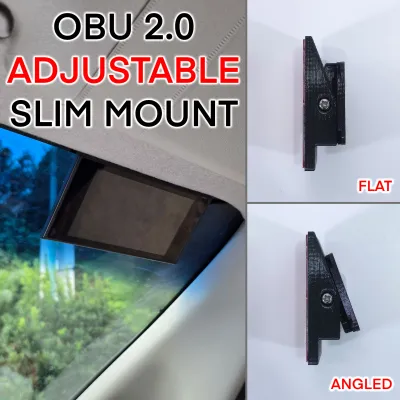
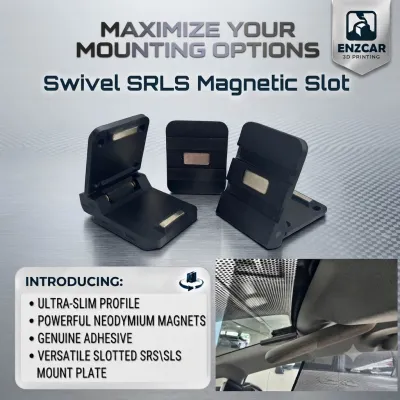

Prices are valid at publication and may change. Please refer to the product page for the latest price.
Driver sightlines are another essential boundary that you must respect. The OBU and phone holder must be positioned so they do not obstruct your view of the road, side mirrors, or the vehicle’s primary instrument cluster. A mount that forces you to crane your neck or blocks your peripheral vision compromises your situational awareness and increases driving risks. Sit in your normal driving position and hold the devices in their proposed spots to verify that your forward field of vision remains entirely unobstructed.
Access to your vehicle’s physical controls and displays must also be preserved. The center console houses vital systems, including climate controls, hazard light buttons, gear shifters, and infotainment screens. Placing a mount directly in front of these controls can make operating your vehicle difficult and highly distracting. Ensure that you can easily reach and operate every button, dial, and touchscreen without your hand or the devices themselves blocking your access or view.
To find a suitable mounting surface, look for flat, stable areas on the center console that are made of rigid plastic or metal trim. These surfaces provide the structural integrity needed to support the weight of the mounts and devices under the stress of road vibrations. Avoid mounting on soft-touch leather, vinyl, or heavily textured plastics, as these materials do not allow adhesives to form a secure, long-lasting bond.
Finally, review the OBU manufacturer’s placement guidelines alongside your vehicle manual’s restrictions. Certain transport authorities and manufacturers specify exact mounting zones to ensure optimal signal transmission for toll collection and parking systems. You must cross-reference these official guidelines with your vehicle’s specific interior geometry to find a location that is both legally compliant and physically practical.
Gathering Tools and Materials for a Secure Installation
Preparing the appropriate supplies before you begin the installation process is essential for achieving a clean, secure, and damage-free setup. The foundation of any adhesive-based mount is proper surface preparation. You will need high-purity isopropyl alcohol (typically 70% or higher, as authorized by your vehicle trim manufacturer) and a clean, lint-free microfiber cloth. These items are used to strip away oils, dust, and interior dressings that would otherwise prevent the adhesive from bonding.

Avoid using household glass cleaners, multi-surface sprays, or detailing wipes to clean the mounting area. These products often leave behind chemical residues, waxes, or silicone films that create a barrier between the adhesive and the console surface, leading to premature mount failure. Stick strictly to isopropyl alcohol and ensure the area is completely dry before applying any adhesive.
Acquire the exact mounting hardware and adhesive pads specified by your OBU slim mount manufacturer. Using unapproved brackets, generic double-sided tape, or household adhesives can result in the unit vibrating loose, falling off, or damaging your dashboard. Manufacturer-approved adhesives are specifically formulated to withstand the extreme temperature fluctuations common inside parked vehicles without melting or losing grip.
Cable management accessories are also vital for keeping your dashboard tidy and safe. Gather small, low-profile adhesive cable clips, hook-and-loop wraps, or zip ties to secure any power cords running from the OBU or phone holder to your vehicle’s USB ports or 12V accessory sockets. Having these tools on hand before you start will allow you to route and secure the wiring neatly as you install each device.
Installing the OBU Slim Mount Step-by-Step
Begin the physical installation by thoroughly cleaning the selected mounting area on your center console. Dampen your microfiber cloth with isopropyl alcohol and gently wipe the surface to remove any dashboard polishes, grease, or dust. Allow the area to air-dry completely for several minutes; applying adhesive to a damp surface will severely compromise the bond strength.
Before peeling off any adhesive backing, perform a dry fit of the OBU slim mount. Place the mount against the console in your chosen position to verify that it sits perfectly flat and does not wobble. This step allows you to confirm that the entire footprint of the adhesive pad will make contact with the console surface, ensuring maximum adhesion.
Once you are satisfied with the positioning, carefully peel the protective liner from the adhesive pad on the OBU slim mount. Align the mount precisely with your pre-determined spot, taking care not to touch the exposed adhesive with your fingers, as skin oils can weaken the bond. Press the mount firmly onto the console surface.
Apply steady, even pressure across the entire base of the mount for at least 30 seconds. This pressure-sensitive adhesive requires physical force to activate the bonding agents and establish a secure connection with the plastic or metal trim. Avoid wiggling or shifting the mount during this process, as doing so can disrupt the initial bond.
Adhesive curing is a critical step that must not be bypassed. Most automotive-grade double-sided tapes require a specific curing period—often up to 24 hours—to reach their maximum bonding strength. Avoid attaching the heavy OBU unit, plugging in cables, or subjecting the mount to any load or road vibration during this curing window. Leaving the mount undisturbed ensures it will remain securely attached for the long term.
Establish clear stopping conditions during the installation process. If you discover that the chosen console surface is heavily textured, curved, or made of a delicate material like open-pore wood or soft leather, halt the installation immediately. Forcing an adhesive mount onto an incompatible surface will result in failure and may permanently damage your vehicle’s interior trim. In such cases, consult your vehicle manual or seek professional installation advice to explore alternative mounting brackets.
Positioning the Phone Holder for Clear Access
With the OBU slim mount securely positioned, you can now plan the placement of your phone holder. Select a phone mount type that complements the remaining space on your console or utilizes alternative anchor points. For example, if the OBU occupies the flat top surface of the console, consider a phone holder that clips onto an adjacent air vent, mounts inside a cup holder, or attaches to a CD slot. This approach prevents the two devices from competing for the same limited flat surface area.
Ensure that your phone, when placed in its holder, does not overlap with the OBU unit or block its display and buttons. The OBU must remain fully visible and accessible for card insertion, status checks, and signal reception. Likewise, the phone screen must not block your vehicle’s primary infotainment screen, backup camera display, or physical climate controls. Maintaining clear separation between the two devices ensures that both remain fully functional.
Sit in the driver’s seat and adjust your normal driving position to test the ergonomics of the setup. Reach out to touch the phone and verify that you can easily place and remove it from the holder without straining or stretching. The phone should be positioned within your peripheral vision so you can glance at navigation prompts without taking your eyes off the road, yet it must not create a distracting glare or physical obstruction.
Verify operational clearance by moving the gear shifter through its entire range of motion—from Park to Drive and Reverse. Ensure that your hand, the gear lever, and the steering wheel have ample clearance and will not accidentally bump into the phone holder or the OBU during sudden maneuvers. If you detect any physical interference, adjust the angle or position of the phone holder until there is clear separation.
Managing Cables and Verifying Final Safety
Proper cable routing is vital to prevent mechanical interference and maintain a clean cabin aesthetic. Route the power cables for both the OBU and the phone holder along the natural seams and crevices of your center console. This keeps the wires tucked away and prevents them from hanging loosely across the dashboard.
Use adhesive cable clips to secure the wires tightly against the console panels. Ensure that no loose loops of wire hang down near the gear shifter, mechanical parking brake, cup holders, or passenger footwell. Under no circumstances should any cable run near the driver’s footwell, where it could interfere with the accelerator, brake, or clutch pedals, posing a severe safety hazard.
Conduct a thorough visual inspection to verify that neither device obstructs critical vehicle controls, warning lights, or driver sightlines. The entire setup should feel rigid and secure, with no loose parts that could rattle or become dislodged while driving over rough road surfaces. A loose mount can quickly become a distraction or a physical hazard if it falls while the vehicle is in motion.
Perform a final functional test while the vehicle is safely parked in a stationary position. Turn on the ignition to power up both the OBU and your phone charger. Verify that the OBU boots up correctly without any interference from the phone’s wireless charging field or cellular signals. Test the phone holder’s grip by inserting your phone and simulating road vibrations with a gentle shake. If any component feels loose, vibrates excessively, or blocks your access to essential vehicle functions, disassemble the setup and adjust the positioning before driving.
Frequently Asked Questions (FAQ)
Can I install the OBU myself, or does it require a professional?
Whether you can perform a self-installation depends on the specific regulations of your local transport authority and the guidelines provided by the OBU manufacturer. In many jurisdictions, the primary OBU installation and electrical wiring must be carried out by an authorized workshop to maintain compliance, preserve your vehicle’s warranty, and ensure proper integration with toll systems. However, mounting secondary accessories like a slim mount bracket onto the console can often be done by the owner, provided you follow the manufacturer’s instructions and do not modify the vehicle’s electrical system. Always check your local transport authority’s official guidelines before making any modifications.
How do I handle textured or curved center console surfaces?
Standard automotive adhesives require a flat, smooth surface to create a secure bond. On textured or curved plastics, the adhesive pad cannot make full contact, leading to premature failure and the risk of the mount falling off while driving. If your center console lacks flat, smooth surfaces, look for alternative mounting solutions such as weighted friction bases, cup holder mounts, or brackets designed to clip into specific panel gaps. Alternatively, consult a professional vehicle accessory installer who can provide customized mounting plates or mechanical brackets tailored to your vehicle’s specific interior geometry.
Will the mount adhesive damage the interior upon removal?
To protect your vehicle’s interior, always check the adhesive manufacturer’s specifications for surface compatibility before application. High-quality automotive double-sided tapes are generally designed to be removable, but they can still damage delicate materials like leather, vinyl, or painted plastics if peeled off improperly. To safely remove a mount, apply gentle heat from a hair dryer to soften the adhesive, then use a piece of dental floss or high-strength fishing line in a sawing motion to slice through the softened foam pad. If you encounter high resistance, stop immediately to avoid tearing the dashboard material, and apply a dedicated adhesive remover that is labeled safe for your specific interior trim.

Community discussion
Share your experience or ask a question. Comments are reviewed before publication.