
Maintaining correct tire pressure is one of the simplest yet most critical aspects of vehicle maintenance. Using a portable digital inflator, such as a Milwaukee air pump, allows you to achieve precise pressure levels quickly and safely without relying on petrol station air pumps, which are often uncalibrated or poorly maintained. Properly managing your tire inflation ensures optimal fuel efficiency, extends the lifespan of your tread, and preserves your vehicle’s handling characteristics. To achieve the best results, you must understand how to prepare your vehicle, configure the pump, execute the inflation process safely, and verify the final readings.
Preparation: Identifying the Correct Target Pressure
Before you connect any inflation equipment to your vehicle, you must determine the exact target pressure specified by your vehicle’s manufacturer. This information is not found on the tire itself, but rather on the vehicle’s tire information placard. You can typically locate this placard on the driver’s side door jamb, visible when the door is open, or within the pages of your vehicle’s owner’s manual. The placard lists the recommended inflation pressures for both the front and rear tires, which may differ depending on the vehicle’s weight distribution and intended load capacity.
It is a common and potentially hazardous mistake to inflate tires to the pressure molded into the tire sidewall. The number on the sidewall represents the maximum inflation pressure the tire can safely hold at its maximum load capacity, not the optimal operating pressure for your specific vehicle. Overinflating to this maximum limit leads to a harsh ride, accelerated center-tread wear, and reduced traction, which can compromise your safety on wet roads. Always adhere strictly to the manufacturer’s recommended pressure on the door placard rather than the maximum limit on the tire.
Products mentioned in this guide
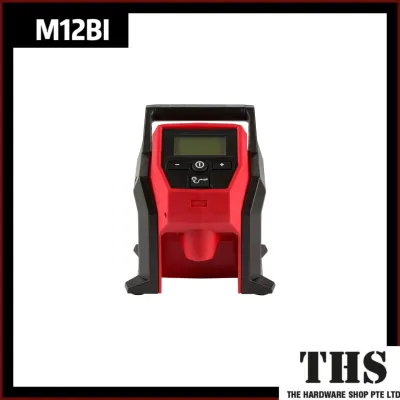
Prices are valid at publication and may change. Please refer to the product page for the latest price.
To obtain an accurate baseline reading, you must ensure your tires are completely “cold” before starting the inflation process. Tires are considered cold when the vehicle has been parked for at least three hours or driven for less than two kilometers at moderate speeds. Driving generates friction and heat, causing the air inside the tire to expand and temporarily raising the pressure reading. If you must inflate warm tires, note that the reading will be artificially high; you should check them again once they have cooled down to confirm they match the recommended cold pressure.
Equipment Setup: Power and Connection Checks
Preparing your Milwaukee air pump requires a systematic check of its power source and physical connections to ensure safe and uninterrupted operation. If you are using a cordless model powered by a lithium-ion battery, check the onboard fuel gauge to verify that the battery has sufficient charge. High-pressure inflation demands significant energy, and a low battery can cause the pump to stall mid-cycle or deliver inaccurate sensor readings. For corded 12V DC or 120V AC models, inspect the power cable for any signs of fraying and ensure the plug is firmly seated in the vehicle’s accessory socket or an appropriate electrical outlet.

Once the power source is verified, inspect the air hose and attach the appropriate chuck to the tire’s valve stem. Most modern portable inflators utilize a screw-on chuck or a quick-connect thumb-latch chuck. Align the chuck carefully with the threads of the valve stem to avoid cross-threading, which can permanently damage the brass threads of the valve. Press or screw the chuck down firmly until you hear a brief hiss of escaping air, then immediately secure the connection. A loose or misaligned connection allows air to escape continuously, preventing the pump from reading the pressure accurately and prolonging the inflation time.
With the physical connection secured, turn on the inflator and navigate the digital interface to select your preferred unit of measurement. Most digital pumps allow you to toggle between PSI (pounds per square inch), bar, and kPa (kilopascals). Refer back to your vehicle’s tire placard to identify which unit is used, and set the pump’s display to match it exactly. This eliminates the need for manual mathematical conversions, reducing the risk of calculation errors that could lead to severe underinflation or overinflation.
The Inflation Process: Achieving the Target Pressure
If your Milwaukee air pump features an automatic shutoff function, you can pre-program your desired target pressure directly into the digital interface. Use the adjustment buttons to set the display to the exact value specified on your vehicle’s placard. If your model does not feature an auto-stop mechanism, you must prepare to monitor the real-time digital gauge continuously throughout the cycle, ready to stop the pump manually the moment the target pressure is reached.
Once the target pressure is set or your manual monitoring plan is in place, initiate the inflation cycle. As the pump runs, observe its physical behavior and the surrounding environment closely. Portable high-pressure pumps naturally generate vibration and noise; however, any sudden change in sound, excessive shaking, or violent movement of the air hose indicates a potential issue. Ensure the pump is placed on a flat, stable surface away from loose gravel or debris that could be sucked into the cooling vents, and never leave the operating pump completely unattended.
Allow the pump to run until it reaches the preset threshold and automatically shuts off, or manually stop the unit when the digital display matches your target. Many digital inflators are programmed to run slightly past the target pressure before settling back down, compensating for the air pressure dynamics inside the hose. Once the pump stops, let the reading stabilize on the screen for a few seconds to confirm the final static pressure.
If you accidentally overinflate the tire, you must bleed off the excess air to reach the correct pressure. Many advanced inflators feature a built-in air release valve or bleed button near the chuck, allowing you to release small amounts of air without disconnecting the hose. If your pump lacks this feature, you can manually depress the small pin inside the center of the tire valve stem using a small tool or the back of a tire gauge. Release the air in short bursts, checking the pressure frequently until the tire is at the exact recommended level.
Verification and Tool Maintenance
Even though modern digital inflators are highly accurate, you should always double-check the final tire pressure using a separate, calibrated manual tire gauge. Handheld dial or digital gauges provide an independent verification of the pump’s internal sensor readings. This step is crucial for identifying any potential calibration drift in your inflation tool over time. If you notice a discrepancy of more than 1 to 2 PSI between the pump and your manual gauge, rely on the calibrated manual gauge and consider having your inflator serviced or calibrated.
Before replacing the valve cap, inspect the valve stem itself for any slow, insidious leaks. A simple and highly effective method is to apply a small amount of soapy water solution to the tip of the valve stem. If you observe bubbles forming, it indicates that the internal valve core is loose or damaged and needs to be tightened or replaced. If no bubbles appear and you hear no hissing sounds, screw the valve cap back onto the stem firmly. The valve cap acts as the primary seal against dirt, moisture, and road debris, protecting the delicate internal valve core from contamination.
Proper maintenance of your Milwaukee air pump is essential for preserving its longevity and ensuring it remains reliable for emergency roadside use. After each use, allow the air hose to cool down completely before wrapping or storing it, as the heat generated during inflation can weaken the rubber or plastic over time. Clean the exterior of the unit with a dry microfiber cloth to remove dust and road grime. Store the pump and its batteries in a dry, temperature-controlled environment, such as a dedicated tool bag or a cool storage area in your home, avoiding prolonged exposure to extreme heat or moisture inside a vehicle’s boot.
Troubleshooting Common Pump and Tire Issues
If you experience slow inflation or if the pump runs continuously without raising the tire pressure, you must systematically isolate the cause. Start by checking the physical connection between the chuck and the valve stem; a loose fit or a damaged internal O-ring inside the chuck is a common source of air leaks. Additionally, inspect the tire’s valve core to ensure it is not stuck in a partially open position. If the connections are secure and the pump still struggles to build pressure, inspect the tire tread and sidewall for punctures, embedded nails, or structural damage that may be releasing air as fast as the pump introduces it.
Portable air pumps are subject to strict duty cycles and thermal limits due to the heat generated by compressing air. If the pump runs continuously for an extended period, it may trigger an automatic thermal overload shutdown to protect the internal motor from permanent damage. If the pump stops unexpectedly or feels excessively hot to the touch, switch it off, disconnect it from the tire, and allow it to cool down completely for at least 15 to 20 minutes before resuming operation. Always consult your specific model’s user manual to understand its recommended duty cycle limits.
There are certain critical tire conditions where you must stop attempting to inflate the tire and instead seek professional assistance. If you observe rapid air loss immediately after turning off the pump, a visible bulge or bubble in the tire sidewall, or if the tire bead has completely unseated from the metal wheel rim, do not attempt further inflation. Operating a pump under these conditions can lead to sudden tire failure or explosive decompression, posing a severe safety risk. In these scenarios, contact a mobile tyre recovery service or tow the vehicle to a professional service center.
Frequently Asked Questions (FAQ)
Can I use a Milwaukee air pump to inflate completely flat tires?
A portable air pump is highly effective for inflating a tire that has lost pressure due to a slow puncture or temperature changes, provided the tire bead remains fully seated on the wheel rim. However, if the tire is completely flat and the bead has separated from the rim, a portable inflator typically cannot deliver the massive, instantaneous volume of air required to seat the bead safely. Attempting to inflate an unseated tire with a portable pump can result in air escaping continuously around the rim, and may damage the tire sidewall. For unseated beads, you should use a high-volume professional air compressor or seek assistance from a professional tire workshop.
How often should I check and adjust my tire pressure?
You should check your tire pressure at least once a month, as well as before embarking on long road trips or carrying heavy loads. In Singapore, the tropical climate and high ambient temperatures mean that road surfaces can become extremely hot, accelerating the heat buildup inside your tires during daily driving. This constant thermal cycling can lead to faster pressure loss over time. Regular monthly checks ensure that your tires remain at their optimal cold pressure, protecting your vehicle’s handling, maximizing fuel efficiency, and preventing uneven tread wear caused by underinflation.

Community discussion
Share your experience or ask a question. Comments are reviewed before publication.