
Finding the ideal Spigen phone mount for your Tesla center console requires matching the specific geometry of your vehicle’s interior with your daily driving habits and phone model. Because Tesla cabins feature minimalist designs dominated by a central touchscreen and a continuous center console, traditional mounting locations like windshields or standard air vents are often impractical or visually disruptive. Spigen addresses this by offering specialized mounts, including adhesive-backed magnetic options that attach to the back of the central display, custom-fit console inserts, and flexible mechanical arms. The most effective choice depends on whether your Tesla is a Model 3, Model Y, Model S, or Model X, as well as the surface materials of your console and your preference for magnetic convenience versus mechanical security.
Understanding Your Tesla's Console Layout and Constraints
Tesla vehicles have undergone several interior redesigns, meaning a mount that fits one model year perfectly may not work on another. For instance, the Model 3 and Model Y produced before 2021 feature a center console with a glossy piano-black finish and a curved, flip-up door. In contrast, post-2021 versions of these models utilize a matte-finished console with a sliding lid and integrated wireless charging pads directly below the touchscreen. If you drive a newer Model 3 or Model Y, mounting a phone directly on the console surface requires careful placement to avoid blocking the dual wireless charging bays or obstructing the sliding mechanism of the storage compartment.
The Model S and Model X present a different set of physical constraints. Their larger, landscape-oriented central screens and lower-profile center consoles alter the driver’s line of sight and physical reach. In these premium models, the console area is often wrapped in vegan leather, wood trim, or carbon fiber, which limits where you can safely apply strong adhesives. Furthermore, the air vents in the Model S and Model X are deeply integrated into the dashboard trim, making standard vent-clip mounts completely incompatible. Understanding these model-specific variations is the first step in avoiding a mount that interferes with your vehicle’s built-in features.
Products mentioned in this guide
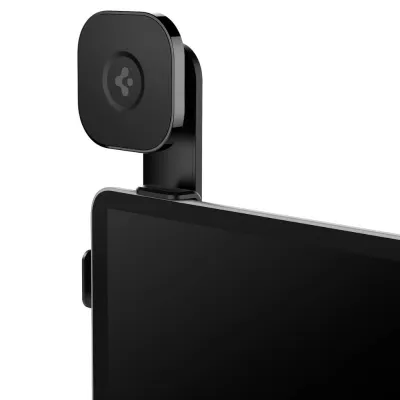
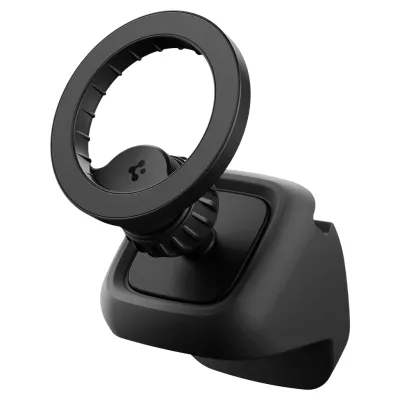
Prices are valid at publication and may change. Please refer to the product page for the latest price.
When identifying potential mounting zones on your center console, you must map out the clearance required for daily operations. A poorly positioned mount can block access to the cup holders, prevent the armrest from opening fully, or interfere with the key card sensor area typically located behind the cup holders on the Model 3 and Model Y. Additionally, you must consider the physical clearance of your phone itself when docked. A large smartphone mounted too close to the console’s storage lid can prevent you from retrieving items from the cubby or cause your hand to strike the phone when reaching for the gear selector stalk or steering wheel.
Surface materials also dictate which mounting bases are safe to use. Tesla interiors utilize a mix of vegan leather, textured plastics, open-pore wood, and metallic trims. Applying a high-strength adhesive pad directly to vegan leather or wood trim carries a high risk of permanent discoloration, peeling, or structural damage upon removal. For these delicate surfaces, friction-based console inserts or mounts that attach to the rigid plastic backing of the central touchscreen are far safer alternatives. If you must use an adhesive mount on the console, limit its application to hard, non-porous plastic surfaces, and always verify the material compatibility listed in the mount’s instruction manual.
Matching Spigen Mount Mechanisms to Your Driving Needs
Spigen offers two primary phone-retention mechanisms: magnetic (MagSafe-compatible) and mechanical grip. Magnetic mounts utilize high-strength magnets to hold your phone in place instantly, offering a clean, minimalist look that complements the Tesla interior. These are highly convenient for quick trips around Singapore, allowing you to mount and dismount your phone with one hand. However, magnetic mounts require either a phone with built-in magnetic capabilities or a specialized magnetic case or adapter ring. For heavier devices or driving on uneven roads, the magnetic connection must be robust enough to prevent the phone from slipping during sudden stops or sharp turns.

Mechanical grip mounts, on the other hand, use spring-loaded or gravity-based clamps to secure the sides of your phone. While bulkier and requiring two hands to operate in some configurations, mechanical mounts provide a highly secure hold that is completely independent of your phone’s case material or magnetic compatibility. This makes them ideal for drivers who use thick, heavy-duty protective cases or those who frequently drive over speed bumps and rough road surfaces. The trade-off is a larger visual footprint on your console, which some drivers feel detracts from the clean aesthetic of the Tesla cabin.
The base of the mount is just as important as how it holds your phone. Spigen mounts generally fall into three base categories: adhesive pads, custom-fit console inserts, and screen-clamping arms. Adhesive bases offer the greatest flexibility in placement but require a permanent or semi-permanent bond to your vehicle’s interior. Custom-fit console inserts slide directly into the storage compartments or cup holders, providing a stable mount without any adhesive residue, though they sacrifice some storage space. Screen-clamping mounts bypass the console entirely by securing onto the outer frame of the central touchscreen, keeping your phone closer to your natural line of sight. While high-quality Tesla-specific mounts typically range from S$30 to S$80, selecting the right mechanism is far more important than price alone.
To help you decide which configuration fits your driving style and vehicle layout, consider the following comparison of common mounting mechanisms and bases:
| Mount Component | Type | Pros | Cons | Ideal Use Case |
|---|---|---|---|---|
| Grip Mechanism | Magnetic (MagSafe) | Minimalist footprint, effortless one-handed docking, clean aesthetic. | Requires magnetic phone/case, lower holding power for extremely heavy cases. | Daily commuting, drivers with MagSafe-compatible iPhones or magnetic cases. |
| Grip Mechanism | Mechanical Clamp | Universal compatibility, highly secure physical hold, accommodates thick cases. | Bulkier design, often requires two hands to mount, more moving parts. | Drivers with heavy-duty cases, rough road conditions, non-magnetic phones. |
| Base Design | Adhesive Pad | Flexible placement options, low profile, highly stable once cured. | Risk of surface damage on leather/wood, semi-permanent, requires curing time. | Flat, hard plastic console surfaces where permanent placement is desired. |
| Base Design | Console Insert | Zero adhesive residue, easy to install and remove, highly stable. | Occupies storage or cup holder space, limited to specific console shapes. | Leased vehicles, drivers who want to avoid adhesives and preserve interior surfaces. |
| Base Design | Screen Mount | Keeps phone near eye level, leaves console completely clear, very secure. | Can slightly obstruct screen edge, longer arm can vibrate on rough roads. | Drivers who rely on phone navigation alongside the main Tesla touchscreen. |
Verifying Fitment, Clearance, and Interior Safety
Before purchasing any Spigen mount, you must verify its physical dimensions against the specific layout of your Tesla’s cabin. A mount that looks compact in product photos may feel surprisingly intrusive once installed in the tight clearance zones of the center console. Measure the base of the mount and compare it to the flat surface area available on your console. If you plan to use an adhesive mount, ensure there is a flat, smooth surface of at least the same dimensions as the adhesive pad; curved or textured surfaces will prevent the adhesive from bonding fully, leading to premature failure.
Line-of-sight obstruction is a critical safety consideration when positioning your phone mount. In Singapore, maintaining a clear, unobstructed view of the road and your vehicle’s primary controls is essential for safe driving. The phone should never block your view of the central touchscreen, which displays critical information such as vehicle speed, autopilot status, and navigation prompts. Likewise, ensure the phone does not block your view of the side mirrors or the forward roadway. Adjust the mount’s extension arm and ball joint during a stationary test fit to find an angle that keeps the phone accessible without creating dangerous blind spots.
Interior safety also involves understanding the environmental limits of the materials used in your mount and vehicle. Center consoles can experience extreme temperature fluctuations, particularly when parked under direct sunlight in tropical climates. High cabin temperatures can soften adhesives, causing mounts to sag or detach entirely while driving. When selecting an adhesive mount, review the manufacturer’s specifications for temperature tolerance and follow the recommended curing time—typically 24 to 48 hours—before placing any weight on the mount. Never mount your phone within the deployment path of any airbags; consult your Tesla owner’s manual to identify these safety zones clearly.
Secure Installation and Long-Term Maintenance Steps
Achieving a secure, long-lasting bond with an adhesive Spigen mount requires meticulous surface preparation. Begin by cleaning the target area on your center console with a mild, automotive-approved interior cleaner that does not leave behind oils, waxes, or silicone residues. Avoid using harsh household chemicals or isopropyl alcohol on delicate surfaces like vegan leather or wood trim, as these can strip protective coatings and cause permanent damage. Once the surface is completely clean and dry, apply the adhesive pad firmly, pressing down evenly across the entire base for at least 30 seconds to activate the pressure-sensitive adhesive.
Cable management is another crucial step that is often overlooked. If you plan to charge your phone while it is mounted, plan a clean routing path for the charging cable. The cable should run from the console’s USB-C ports to the phone without draping over the steering column, gear selector stalk, or physical controls. Loose, dangling cables can easily snag on your hands or arms while steering, creating a serious driving hazard. Use small, adhesive cable clips along the underside of the console trim or behind the touchscreen to keep the cable tucked away neatly and securely.
To ensure your mount remains safe and functional over time, establish a simple monthly inspection routine. Check the mechanical joints and tightening collars of the mount to ensure they have not vibrated loose during travel. For magnetic mounts, inspect the magnetic face for any dirt, grit, or metal shavings that could scratch your phone case or reduce magnetic grip. If you are using an adhesive mount, gently wiggle the base to verify that the bond remains firm, especially after periods of intense cabin heat. If you notice any lifting or peeling at the edges of the adhesive pad, remove the mount immediately and replace the adhesive tape to prevent the phone from falling while the vehicle is in motion.
Frequently Asked Questions (FAQ)
Will a console-mounted phone block the Tesla touchscreen controls?
A console-mounted phone can potentially block portions of the Tesla touchscreen if it is positioned too high or too close to the display’s edge. Because the Tesla touchscreen controls almost every vehicle function—including climate control, media, and safety settings—maintaining unobstructed access to the screen is vital. To prevent blockage, choose a Spigen mount with an adjustable arm or a 360-degree ball joint. This allows you to angle the phone downward or offset it to the side, keeping the screen’s lower and side menus fully visible and reachable. Before peeling off any adhesive backing, sit in the driver’s seat and perform a dry run to ensure you can comfortably reach all areas of the touchscreen with the phone docked.
Can I use a standard Spigen vent clip mount in a Tesla?
Standard vent clip mounts are generally incompatible with the unique, minimalist air vent designs found in Tesla vehicles. Unlike traditional cars with exposed plastic slats, the Model 3 and Model Y feature a continuous, hidden vent slot integrated into the dashboard, while the Model S and Model X use electronically controlled directional vents. Attempting to force a standard vent clip into these narrow openings can damage the delicate internal louvers or scratch the dashboard trim. If you prefer a mount positioned near the dashboard level, look for Spigen models specifically engineered for Tesla interiors, such as those that clamp securely to the outer bezel of the central touchscreen or utilize custom-fit dashboard bases.
How do I safely remove an adhesive Spigen mount from the console?
Removing an adhesive mount without damaging your Tesla’s interior requires patience and the right technique. Never pry or yank the mount upward, as this can tear vegan leather or scratch plastic trim. Instead, use a piece of dental floss or high-strength fishing line. Hold the line taut with both hands and gently slide it back and forth underneath the adhesive pad in a sawing motion to slice through the foam tape. Once the mount is detached, you can roll off any remaining adhesive residue with your thumb or apply a small amount of a mild, automotive-safe adhesive remover to a microfiber cloth. Always test the adhesive remover on an inconspicuous area first to ensure it does not discolor or damage the console material.

Community discussion
Share your experience or ask a question. Comments are reviewed before publication.