
Selecting a phone mount for the BYD Atto 3 requires a careful understanding of the vehicle’s highly stylized, aviation-inspired cabin. The central feature of this interior is the large, motorized rotating touchscreen, which can transition between portrait and landscape modes at the touch of a button. Because of this dynamic movement, standard universal phone mounts that clip onto the dashboard or windshield often block the screen’s path or get struck during rotation. Furthermore, the car’s distinctive circular, turbine-style air vents and heavily contoured, soft-touch dashboard surfaces make traditional mounting solutions impractical or even damaging to the interior materials.
To find the most secure and non-destructive setup, drivers must evaluate specialized mounting categories designed specifically for this vehicle’s geometry. The most successful options include screen-edge clamp mounts that attach directly to the rotating display bezel, custom-molded console-crevice brackets, and circular vent adapters equipped with mechanical hook tensioners. Each of these designs offers distinct trade-offs regarding driver visibility, ease of installation, and physical stability. By analyzing these options against the physical constraints of the cabin, you can maintain full access to your vehicle’s features while keeping your smartphone safely positioned.
Understanding the BYD Atto 3 Dashboard Constraints
The primary challenge when installing any interior accessory in the BYD Atto 3 is the sweep zone of the central infotainment screen. Whether your vehicle is equipped with the 12.8-inch or the larger 15.6-inch display, the screen requires a clear, unobstructed radius to rotate a full 90 degrees. Any phone mount positioned too close to the screen’s edge will physically collide with the dashboard, the hazard light switch, or the climate control vents during this rotation. Drivers must measure the clearance behind and around the screen in both orientations before selecting a mounting location.
Products mentioned in this guide
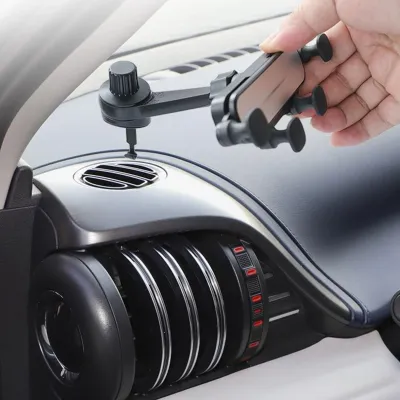
Prices are valid at publication and may change. Please refer to the product page for the latest price.
Another major obstacle is the design of the air conditioning vents. Unlike conventional vehicles that feature flat, horizontal or vertical louvers, the Atto 3 utilizes circular, turbine-style vents with thick, curved blades and a central directional dial. Standard spring-loaded vent clips cannot grip these curved surfaces securely, often slipping off under the weight of a modern smartphone or damaging the delicate directional mechanism. Any vent-mounted solution must feature a specialized adapter designed to lock onto circular vent structures without restricting their movement.
The dashboard itself presents a highly contoured, wavy aesthetic wrapped in textured synthetic leather and soft-touch plastics. These curved surfaces prevent standard suction cups from forming an airtight seal, leading to frequent drops, especially when the vehicle is exposed to direct sunlight. Additionally, flat adhesive pads cannot achieve full surface contact on these wavy panels, which significantly reduces their load-bearing capacity.
Finally, safety must remain the top priority when planning your mount placement. The front passenger dashboard houses a large airbag deployment zone, and the side pillars contain curtain airbags that must never be obstructed by accessories or routing cables. Furthermore, any mount placed on the upper dashboard or windshield must comply with local road safety regulations, ensuring that the driver’s forward line of sight remains completely unobstructed.
Evaluating Phone Mount Types for the Atto 3
To determine which phone mount type best suits your driving habits, it is helpful to evaluate each option across three primary performance areas: screen clearance, surface adhesion, and vent compatibility. Each mounting style has unique physical requirements and potential risks that must be weighed against its convenience.

Screen-Edge and Dashboard Clip-On Mounts
Screen-edge mounts are designed to clamp directly onto the outer bezel of the rotating infotainment display. This positioning keeps the phone high in the driver’s line of sight, making it highly convenient for navigation. However, because the mount is physically attached to the screen, it rotates along with the display. Drivers must verify that the mount arm and the phone itself do not strike the dashboard or the steering column when transitioning from landscape to portrait mode.
The mechanical pressure exerted by these clamps is another critical factor to consider. The bezel of the Atto 3’s screen is relatively thin, and excessive clamping force can compress the underlying LCD panel. This compression can lead to localized screen bleeding, touch-sensitivity issues, or permanent display discoloration over time. To mitigate this risk, select mounts that feature thick, soft silicone padding on the inner jaws of the clamp to distribute the pressure evenly.
Before purchasing a screen-edge mount, always check the manufacturer’s specifications regarding jaw depth and maximum opening width. The clamp must match the exact thickness of the Atto 3’s screen housing to prevent slipping. A loose clamp can vibrate during travel, causing distracting rattles and potentially scratching the plastic bezel of the display.
Air Vent Mounts and Circular Vent Compatibility
Traditional vent mounts that rely on simple rubber prongs are entirely incompatible with the Atto 3’s circular, turbine-style air outlets. These prongs cannot grip the thick, rotating outer ring of the vent, and attempting to force them into the mechanism can bend or snap the internal directional blades. Instead, drivers must look for specialized circular vent adapters that utilize a mechanical hook-and-collar system.
These specialized adapters feature a metal hook that extends deep into the vent housing to grab the rear edge of an internal structural support. A threaded collar on the outside of the vent is then tightened, pulling the hook taut and locking the mount firmly against the outer face of the vent. This design provides a highly stable base that can support heavier smartphones without vibrating or slipping.
However, mounting a phone directly in front of an air vent introduces several practical drawbacks. In tropical climates like Singapore, blocking a primary air vent can noticeably reduce the cabin’s cooling efficiency, forcing the air conditioning system to work harder. Additionally, exposing a smartphone to continuous cold airflow can cause condensation to form inside the device once it is removed from the vehicle, potentially damaging internal electronics. Conversely, using the vehicle’s heater in colder climates can cause the phone to overheat rapidly if the vent is not manually closed.
Adhesive and Suction Cup Dashboard Mounts
For drivers who prefer a more traditional mounting location, adhesive and suction cup mounts remain a popular choice, though they require careful placement on the Atto 3’s contoured dashboard. Because flat surfaces are extremely limited, the most viable location is often the flat plastic trim behind the rotating screen or the lower section of the center console near the wireless charging tray. Mounting the base behind the screen allows for an adjustable arm to extend the phone outward, keeping it accessible without blocking the display.
In regions with high ambient temperatures and intense sunlight, such as Singapore, the durability of adhesive bases is a major concern. Standard double-sided foam tapes often soften and lose their grip when the cabin temperature rises while parked outdoors. This can cause the mount to sag or detach entirely, potentially damaging the phone or the center console. To prevent this, look for mounts that utilize high-temperature acrylic adhesives or heavy-duty polyurethane suction cups designed to withstand extreme cabin heat.
Protecting the vehicle’s interior trim is equally important. The Atto 3’s dashboard is covered in a delicate, textured synthetic leather that can be easily torn or discolored by aggressive chemical adhesives. When installing an adhesive mount, always use a residue-free adhesive gel pad. These pads provide a strong bond but can be peeled away cleanly without lifting the synthetic leather or leaving behind a stubborn, sticky residue that is difficult to clean.
Console Crevice and Gap-Fit Mounts
Console crevice mounts, also known as gap-fit or bracket mounts, offer a highly secure, semi-permanent solution by utilizing the natural seams between the vehicle’s interior panels. These mounts feature a thin, rigid plastic or metal base that is designed to wedge tightly into the gaps of the center console, typically near the gear selector or beneath the floating infotainment screen. Because they do not rely on adhesives or suction, they are highly resistant to temperature fluctuations and vibrations.
Before attempting to install a gap-fit mount, it is essential to inspect the console panel gaps carefully. Use a soft plastic trim removal tool to gently probe the seam to ensure there is enough flexibility to accommodate the mount’s wedge without cracking the surrounding plastic. If the gap is too tight, forcing the bracket in can cause permanent misalignment of the console panels or create persistent interior squeaks and rattles.
To protect the vehicle’s premium finishes, ensure the mounting bracket is lined with felt tape or soft rubber padding where it contacts the interior trim. Unprotected metal or hard plastic edges can easily scratch the glossy piano-black plastic or tear the blue-and-grey synthetic leather panels that line the center console. Additionally, consider the ergonomic impact of this placement; mounting the phone lower in the console keeps it out of your forward line of sight, which is excellent for reducing distractions but may require you to look down too far when following active navigation prompts.
Selection Checklist and Installation Safety
Before purchasing any phone mount for your BYD Atto 3, compile a pre-purchase checklist to ensure compatibility with both your vehicle and your smartphone. First, verify the mount’s maximum arm reach and weight capacity, particularly if you use a heavy flagship phone or a thick protective case. If you rely on wireless charging, ensure the mount’s backing does not interfere with your phone’s internal charging coils or MagSafe alignment.
Once you have selected a mount, perform a thorough dry-run installation before hitting the road. Secure the mount base in your chosen location without attaching your phone, and manually trigger the infotainment screen’s rotation cycle. Watch the movement closely to confirm there is at least a two-centimeter clearance gap between the rotating screen and any part of the mount. This step is crucial to prevent costly damage to the screen’s electric motor or the display panel itself.
Finally, strictly adhere to automotive safety standards during installation. Never position a phone mount on or near the steering wheel hub, as this will obstruct the driver’s airbag in an accident. Avoid placing large mounts high on the windshield or on the A-pillars, where they can create dangerous blind spots or interfere with the side curtain airbags. The ideal mounting position should keep your phone within your peripheral vision while ensuring your primary view of the road and side mirrors remains completely unobstructed.
Frequently Asked Questions (FAQ)
Will a phone mount block the BYD Atto 3's 360-degree camera view?
No, installing an interior phone mount will not physically block or interfere with the BYD Atto 3’s external 360-degree camera system. The cameras responsible for generating the bird’s-eye view are located externally on the front grille, the side mirrors, and the rear tailgate. However, you must avoid placing large mounts or long extension arms high on the windshield or near the rearview mirror housing. This area contains the vehicle’s forward-facing Advanced Driver Assistance Systems (ADAS) cameras and interior cabin monitoring sensors, which must remain completely unobstructed to function correctly.
Can I use a MagSafe magnetic mount on the Atto 3 dashboard?
Yes, you can use a MagSafe or magnetic phone mount in the Atto 3, but the magnetic head itself is only half of the solution. The mount’s base must still be securely attached to the vehicle using one of the compatible methods discussed above, such as a specialized vent hook or a high-temperature adhesive pad. Additionally, be aware that extreme cabin temperatures can temporarily reduce the holding strength of neodymium magnets. If you frequently park in direct sunlight, ensure your magnetic mount features a secure secondary retention lip or high-grade magnets to prevent your phone from falling during sudden stops.
How do I remove adhesive mount residue from the Atto 3 interior?
To safely remove adhesive residue from the Atto 3’s synthetic leather dashboard or plastic trim, start by applying a small amount of mild automotive interior cleaner or isopropyl alcohol to a clean microfiber cloth. Gently rub the residue in a circular motion, allowing the solvent to break down the adhesive bonds. Never spray any liquid cleaner directly onto the dashboard, as it can seep into electronic components or the rotating screen mechanism. Always test the cleaner on a small, hidden area of the trim first to ensure it does not cause discoloration. Strictly avoid using sharp metal scrapers, razor blades, or abrasive scrubbing pads, as these will permanently gouge and ruin the soft-touch interior surfaces.

Community discussion
Share your experience or ask a question. Comments are reviewed before publication.