
Quick Compatibility Guide for Forester Dashboard Layouts
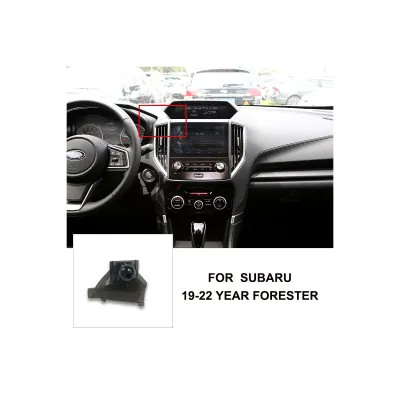
Finding the right phone holder for a Subaru Forester requires a close look at the vehicle’s unique multi-tiered dashboard geometry. Unlike standard flat dashboards, the Forester features a distinct layout that often includes a central infotainment screen, an upper multi-function display (MFD) hood, and textured, soft-touch materials. These design elements create specific physical boundaries that rule out many generic, one-size-fits-all mounting solutions.
When evaluating your Forester’s cabin, you must consider three primary factors: dashboard surface texture, air vent design, and safety zones. The upper dashboard is typically covered in a textured, slightly yielding material designed to reduce glare, which makes it difficult for standard suction cups to maintain a reliable vacuum seal. Additionally, the physical contours around the central screen and the upper MFD hood limit the flat surface area available for adhesive pads.
Air vent configurations also vary significantly across different Forester generations. Some models feature prominent vertical vents flanking the main screen, while others utilize more traditional horizontal designs. The thickness of the vent blades and the depth of the vent housing will directly dictate whether a clip-style mount can grip securely without slipping or damaging the delicate directional adjustment mechanisms.
Products mentioned in this guide
Prices are valid at publication and may change. Please refer to the product page for the latest price.
Safety must remain your highest priority when choosing a mounting location. The Forester is widely known for its advanced safety systems, including the windshield-mounted EyeSight driver assist cameras. Any phone holder you install must stay completely clear of the EyeSight system’s field of view, avoid blocking your physical line of sight through the windshield, and remain outside the deployment paths of the steering wheel and passenger-side airbags.
Assessing Vent Clip Mounts for Forester Air Vents
Vent clip mounts are highly popular due to their easy installation and low profile, but they present specific compatibility challenges when paired with a Forester’s air vents. To determine if a vent mount is viable for your vehicle, you must first inspect the orientation and structural design of the vent blades. Many modern Forester models utilize vertical air vents flanking the central touchscreen, which behave differently under the weight of a phone compared to standard horizontal vents.

Vertical vent blades require a mount with a highly secure, non-slip clamping mechanism. Because gravity pulls the phone downward, a simple push-on rubber clip will often slide down the vertical blade, causing the phone to tilt or fall. Look for vent mounts that feature a mechanical hook or a screw-tightened clamp. These designs physically latch onto the back edge of the vent blade, distributing the weight more evenly and preventing the mount from sliding off during sudden stops or sharp turns.
Key Vent Dimensions to Verify Before Purchase:
- Blade Thickness: Measure or closely inspect the thickness of the individual plastic slats. Some heavy-duty mounts require a minimum clearance between blades to insert the clamping mechanism.
- Vent Depth: Ensure the clip or hook is long enough to reach past the front edge of the blade to secure itself on the rear structural support.
- Adjustment Clearance: Verify that the mount's housing does not completely lock the vent's directional wheel or lever, allowing you to still control airflow.
Another critical consideration is the proximity of the vents to essential cabin controls. Because the Forester’s central vents sit directly adjacent to the infotainment screen and just above the physical climate control dials or hazard light button, a large smartphone mounted here can easily block your view of these interfaces. Before committing to a vent mount, hold your phone up to the vent to check if it obstructs your access to the hazard switch or blocks a portion of the backup camera display.
Finally, consider the impact of your vehicle’s climate control system on your device. Mounting a phone directly in front of an active air vent exposes it to extreme temperature fluctuations. In cold weather, running the car’s heater can quickly cause your phone to overheat, leading to thermal shutdown or battery degradation. Conversely, using the air conditioning in humid environments can cause condensation to form on the back of a cold phone. If you choose a vent mount, select one that allows you to close the airflow to that specific vent when the heater is running.
Suction Cup and Adhesive Mounts: Dash Surface and Safety Checks
Mounting your phone directly to the dashboard or windshield offers excellent visibility, but the Forester’s interior materials and safety systems impose strict limitations. The soft-touch, textured synthetic materials used on the Forester’s dashboard are designed for aesthetics and impact absorption, but they are highly challenging surfaces for suction cups. Standard suction mounts rely on a perfectly smooth, non-porous surface to maintain a vacuum seal; on a textured dash, microscopic air gaps will eventually cause the suction cup to fail.
To use a suction mount on the dashboard, you will typically need a semi-permanent adhesive mounting disk. This disk features a strong adhesive backing that fills the texture gaps of the dashboard, providing a smooth plastic surface for the suction cup to grip. However, you must verify that the adhesive is safe for soft-touch plastics. High cabin temperatures, especially in hot or tropical climates, can cause some adhesives to degrade, melt, or chemically react with the dashboard material, leaving permanent discoloration or physical indentations when removed.
Step-by-Step Dashboard Surface Assessment:
- Texture Check: Run your fingers over the desired mounting area. If it feels rubbery, grained, or soft to the touch, standard suction will not work without an adhesive disk.
- Contour Check: Ensure the selected area is completely flat. Even a slight curvature will prevent an adhesive disk or suction base from making full contact.
- Heat Exposure: Avoid placing adhesive mounts in areas of the dashboard that receive direct, concentrated sunlight through the windshield, as this accelerates adhesive failure.
Safety boundaries are paramount when positioning a dashboard or windshield mount. You must strictly avoid the deployment zones of the vehicle’s Supplemental Restraint System (SRS) airbags. The passenger-side airbag deploys upward and outward from the upper dashboard panel, while side curtain airbags deploy from the A-pillars. Never mount a phone holder or route charging cables across any panel marked with “SRS Airbag.”
For Forester models equipped with the EyeSight driver assist system, windshield mounting requires extreme caution. The dual cameras mounted near the rearview mirror rely on a completely unobstructed view of the road ahead to operate features like pre-collision braking and lane-keep assist. Subaru’s official documentation outlines a strict exclusion zone on the windshield where no accessories, toll readers, or phone mounts may be placed. Before mounting anything to the glass, consult your owner’s manual to identify the exact boundaries of this exclusion zone to ensure you do not compromise your vehicle’s active safety systems.
CD Slot and Alternative Mounting Solutions
For drivers who prefer to keep their dashboard and windshield completely clear, alternative mounting styles can offer a practical solution. Depending on the model year and trim level of your Forester, you may have access to a physical CD slot in the center console. CD slot mounts insert a thin plastic blade into the player’s opening, which is then expanded using a thumb screw or lever to create a tight, friction-based fit within the slot.
While CD slot mounts are incredibly stable and place the phone at an easy-to-reach height, you must verify that your specific Forester trim actually features a CD player. Many newer models have transitioned entirely to digital infotainment systems, omitting the physical CD drive altogether. If your vehicle does have a CD slot, inspect the internal mechanism before installing a mount. Ensure the expansion blade of the mount does not insert so deeply that it damages the internal optical laser, dust flaps, or automatic loading rollers.
Evaluating Alternative Mounting Locations:
- Rearview Mirror Mounts: These clamps attach directly to the stem of the rearview mirror, suspending the phone below it. While they keep the phone at eye level, they can add significant weight to the mirror assembly, causing it to vibrate or droop while driving over rough surfaces. They may also interfere with auto-dimming mirror sensors or the EyeSight camera housing.
- Steering Column Mounts: These mounts strap onto the steering column shroud directly behind the steering wheel. While they keep the phone in your forward line of sight, they can easily block your view of the instrument cluster, including the speedometer and warning lights, which presents a serious safety hazard.
- Cup Holder Mounts: Utilizing an adjustable base that expands to fit securely inside a standard cup holder, these mounts are highly stable and require no adhesive or clips. The primary trade-off is ergonomics; because the Forester's cup holders are located low in the center console, looking down at a phone in this position takes your eyes completely off the road, making them unsuitable for active navigation.
Each alternative mounting style comes with distinct trade-offs in stability, adjustability, and physical vibration. For example, a cup holder mount with a long, flexible gooseneck may shake significantly on uneven roads, making the screen difficult to read. When choosing an alternative mount, prioritize designs with rigid, short adjustment arms and robust locking joints to minimize movement and prevent distracting rattles.
Building Your Forester Phone Holder Shortlist
Selecting the right phone holder comes down to matching your specific driving habits, phone dimensions, and vehicle layout into a cohesive decision framework. Start by analyzing your physical device. A heavy, ruggedized smartphone with a thick protective case will require a mount with deep side arms or an exceptionally strong magnetic connection. If you use a wallet case or a finger ring accessory on the back of your phone, standard cradle mounts may not close properly, making a magnetic or gravity-style mount a more reliable choice.
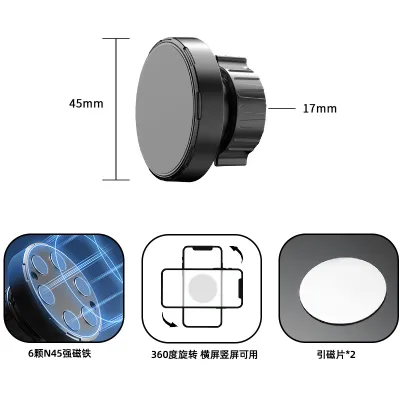
Next, prioritize the operational features that match how you use your phone on a daily basis. If you frequently get in and out of your vehicle, a one-handed quick-release mechanism or a magnetic alignment system (such as those compatible with MagSafe) will save time and frustration. Ensure the bottom support feet of any cradle-style mount leave sufficient clearance for your phone’s charging port, allowing you to connect a cable without bending or straining the connector.
Pre-Purchase Verification Checklist:
- [ ] Measure the Vent/Dash Space: Compare the physical dimensions of the mount's base against the available flat space or vent blade clearance in your Forester.
- [ ] Check EyeSight Clearance: Confirm that the mounted phone will not protrude into the windshield exclusion zone if you are using a high-dash or glass mount.
- [ ] Verify Return Policies: Because dashboard textures and vent angles can be highly specific, purchase from retailers or online marketplaces that offer hassle-free returns if the fitment is not perfect.
- [ ] Review Cable Routing: Plan how your charging cable will run from the USB port to the mount without draping across the steering wheel, gear shifter, or physical climate controls.
By systematically checking these physical and operational constraints, you can avoid the trial-and-error process of buying and returning incompatible accessories. A well-chosen phone holder should feel like an integrated part of your Forester’s cabin, keeping your device secure, accessible, and completely safe without compromising your view of the road.
Frequently Asked Questions (FAQ)
Will an adhesive dashboard mount leave residue on the Forester's soft-touch dash?
Yes, some adhesive pads can leave a sticky residue, and in worse cases, they can cause permanent cosmetic damage to the Forester’s soft-touch dashboard. The synthetic materials and textured coatings used on modern dashboards can react chemically with the strong adhesives found on mounting disks, especially when exposed to high cabin temperatures under direct sunlight. Over time, this heat can cause the adhesive to bond permanently with the top layer of the dash material.
To prevent damage, always check the manufacturer’s instructions to see if the adhesive is rated as safe for textured or soft-touch automotive plastics. Before applying the mount to a highly visible area, perform a spot test by applying a small piece of the adhesive or a similar high-quality mounting tape to an inconspicuous area of the dashboard, such as the lower side panel near the footwell. Leave it in place for a few days, then remove it to check for any signs of discoloration, peeling, or material softening.
When removing an adhesive mount, never pull it straight up, as this can tear the soft-touch surface. Instead, use a plastic trim removal tool or a piece of dental floss slid gently underneath the pad to saw through the adhesive layer. Any remaining residue can usually be cleaned using a mild, solvent-free automotive interior cleaner or a specialized adhesive remover that is explicitly labeled as safe for interior plastics. Avoid harsh solvents like acetone or rubbing alcohol, which can instantly strip the color and protective coatings from your dashboard.
Do magnetic phone mounts interfere with the Forester's compass or electronics?
Generally, high-quality magnetic phone mounts will not interfere with your Forester’s primary dashboard electronics, infotainment screen, or engine management systems. The magnets used in these mounts are designed to project a localized magnetic field that secures the metal plate on your phone case without emitting strong electromagnetic radiation that could disrupt solid-state vehicle electronics.
However, you must be cautious about placing strong magnets in close proximity to specific directional sensors. If your Forester is equipped with an auto-dimming rearview mirror that features a built-in digital compass, mounting a strong magnetic holder directly to the mirror stem or on the upper windshield nearby can distort the compass readings. The magnetic field can confuse the sensor, causing it to display incorrect driving directions on your mirror or multi-function display.
To ensure complete safety and prevent any potential interference, consult your Forester’s owner’s manual to locate any sensitive electronic sensors, GPS antennas, or communication modules embedded in the dashboard. As a general rule, maintain a distance of at least 15 to 20 centimeters between a magnetic mount and the rearview mirror assembly, the main instrument cluster, or the upper MFD housing. If you notice your vehicle’s digital compass or GPS navigation acting erratically after installing a magnetic mount, relocate the holder to a lower position, such as a vent clip or a console-mounted bracket, to resolve the issue.
Community discussion
Share your experience or ask a question. Comments are reviewed before publication.