
Installing an On-Board Unit (OBU) cover on your dashboard requires balancing physical protection with uninterrupted signal reception. The key to a successful installation lies in selecting non-shielding materials, strictly avoiding the device’s antenna and sensor zones, and verifying functionality through real-world testing. This guide walks you through the safe preparation, installation, and verification steps to ensure your Electronic Road Pricing (ERP) device operates flawlessly.
As motoring technology evolves, the transition to next-generation Global Navigation Satellite System (GNSS) OBUs introduces new hardware configurations to your vehicle’s interior. While aftermarket covers are popular for protecting these units from intense tropical heat or matching them to your cabin’s aesthetic, an incorrect installation can easily degrade signal performance. A blocked signal leads to missed gantry handshakes, resulting in administrative fees, payment card errors, and unnecessary stress. By taking a systematic approach to material selection and physical placement, you can safeguard your device without compromising its critical communication links.
Evaluating OBU Cover Materials for Signal Transparency
To ensure your OBU cover does not interfere with toll collection, you must understand how different materials interact with radio frequencies. Legacy In-Vehicle Units (IUs) rely primarily on Dedicated Short-Range Communications (DSRC) microwave signals to communicate with overhead gantries. In contrast, next-generation GNSS-based OBUs require a clear line of sight to overhead satellites for positioning, alongside localized microwave communication. This dual-signal requirement makes signal path clarity more critical than ever.
Products mentioned in this guide
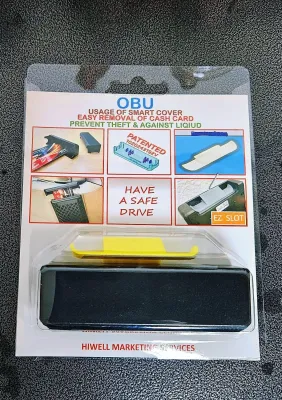
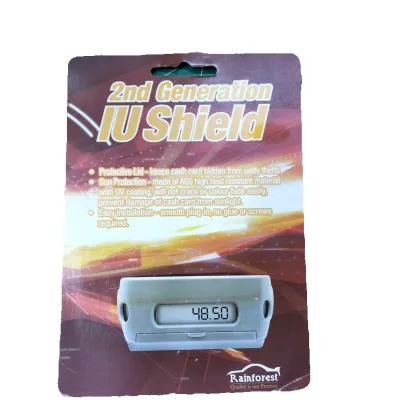
128 Lazada user ratings
🔌Compatibility:fit the obu nicely. easy to remove and not tight 🔧Durability:solid plastic material 🛠️Ease of Installation:plug and play
item received in good condition and well package. quality looks good.
🔌Compatibility: 10/10 🔧Durability: 10/10 🛠️Ease of Installation: 10/10
It is a very simple working product. Looks ok ok ok ok ok ok ok ok.
Prices are valid at publication and may change. Please refer to the product page for the latest price.
Certain material characteristics are notorious for blocking or severely degrading electromagnetic waves. You must avoid any covers containing metals, carbon fiber, metal-infused fabrics, or metallic paints. Even a small amount of carbon fiber weave or metallic flake can create a partial Faraday cage, attenuating incoming satellite signals and preventing successful gantry handshakes. Always verify the material composition against the manufacturer’s specifications before purchasing.
For optimal signal transparency, select covers made from high-grade silicone, pure ABS plastic, polycarbonate, or untreated natural leather. These non-conductive materials have low relative permittivity, allowing microwave and satellite signals to pass through with minimal attenuation. However, because synthetic blends can sometimes contain metallic chemical stabilizers or conductive dyes, always confirm with the accessory manufacturer that the specific cover model is rated as “signal-transparent” or “RF-friendly” for your exact OBU model.
Preparing the Dashboard and Identifying Signal Zones
Before mounting your cover, proper surface preparation and device mapping are essential to prevent physical damage and signal blockage. Dashboard surfaces naturally accumulate dust, plasticizer outgassing, and residues from interior dressings. These contaminants create a slick barrier that prevents adhesives from bonding securely, which can cause the cover to slide during transit.

To clean the installation area safely, use a clean microfiber cloth and a mild, interior-safe cleaner or a highly diluted isopropyl alcohol solution (70% or lower), ensuring compatibility with your vehicle’s dashboard material. Never use harsh industrial solvents, paint thinners, or abrasive scrubbers, as these can permanently discolor the dashboard or degrade the OBU’s plastic housing. Allow the cleaned surface to dry completely before proceeding.
Next, consult your OBU’s user manual to identify and map out its critical “no-cover zones.” These include the internal antenna arrays, GNSS receiver modules, ventilation slots, LED status indicators, and the smart card insertion slot. Your cover must feature precise cutouts that leave these areas completely exposed. Blocking the ventilation slots is particularly dangerous, as trapped heat can cause the OBU to overheat, leading to system errors or permanent hardware failure.
Additionally, assess the compounding effects of your windshield’s solar film. Many high-performance window tints utilize metallic or ceramic-metallic layers to reject heat. These films already reduce the strength of incoming satellite and microwave signals. If your windshield features a heavy solar tint, adding even a slightly restrictive OBU cover can push signal reception below the operational threshold, leading to transaction failures.
Step-by-Step Installation for a Secure and Clear Fit
When you are ready to install the cover, prioritize safety and physical stability. Before beginning, verify that the OBU and its cover do not obstruct the driver’s forward field of vision or obscure any portion of the windshield required for road visibility. Crucially, ensure the installation path is completely clear of passenger and side-curtain airbag deployment zones. Refer to your vehicle’s owner manual to identify these safety zones, as a loose cover launched by an inflating airbag can cause severe injury.
Step 1: Perform a dry fit. Place the cover over the OBU without removing any adhesive backings. Carefully inspect the alignment to confirm that all cutouts correspond perfectly with the card slot, buttons, LED indicators, and display screen. Ensure the cover does not pinch any wiring harnesses or block the ventilation grilles.
Step 2: Apply recommended, non-destructive mounting methods. Use high-quality, automotive-grade double-sided acrylic foam tape or heat-resistant hook-and-loop fasteners. Avoid permanent superglues, cyanoacrylates, or solvent-based adhesives, which can permanently bond the cover to the OBU casing, voiding the device warranty and damaging the unit if removal is ever required. Apply the adhesive sparingly to the designated flat mounting points on the cover.
Step 3: Secure and test for vibrations. Press the cover firmly onto the OBU casing for at least 30 seconds to activate the pressure-sensitive adhesive. Allow the adhesive to cure according to the manufacturer’s instructions—typically 24 hours—before exposing the vehicle to direct, intense sunlight. Gently wiggle the cover to ensure there is no play. A loose cover can rattle, shift during sudden braking, or slide off, creating a dangerous distraction or physically blocking the antenna at a critical moment.
Verifying ERP Signal Reception on the Road
Once the cover is securely installed, you must validate that the OBU is fully functional and receiving signals correctly before driving through active toll zones. Start by utilizing the OBU’s built-in self-diagnostic mode or status indicators. Turn on your vehicle’s ignition and observe the startup sequence. Check the display screen or LED indicators for any error codes, red warning lights, or signal search icons. If the unit features a companion mobile application, run its diagnostic routine to verify satellite connectivity and hardware health.
Next, plan a practical road test route that passes under known, active ERP gantries. To minimize financial risk, select a route with a low-charge or off-peak gantry, or use a designated test lane if available at authorized vehicle inspection centers. Approach the gantry at a safe, steady speed within the posted limit to give the system ample time to perform the wireless handshake.
During the test, closely monitor the OBU’s audio and visual feedback. Listen for the standard transaction beep and watch the screen to confirm successful toll deduction and the display of your remaining card balance. A delayed beep, a double beep indicating an error, or a completely silent pass indicates a signal reception issue. Ensure your payment card is properly inserted and has sufficient balance during this test to rule out card-reading errors.
Troubleshooting Connection Errors After Installation
If you experience transaction failures or weak signal warnings after installing the cover, systematic troubleshooting can help identify the cause. First, safely park your vehicle and inspect the cover for physical shifting. High cabin temperatures can soften adhesives, causing the cover to sag or slide over the antenna array or light sensors.
Next, evaluate any new environmental variables. Consider if other accessories were installed around the same time, such as a dashcam, a mobile phone holder, or a new windshield sunshade. Metallic brackets, electronic devices, and dense wiring harnesses placed in close proximity to the OBU can cause localized electromagnetic interference, compounding the signal loss from the cover.
If signal errors persist after removing the cover, or if you suspect the OBU itself is malfunctioning, cease self-troubleshooting. Do not attempt to disassemble, splice, or modify the OBU’s internal wiring or casing. Visit an authorized OBU customer service center or an authorized workshop to have the unit professionally tested and diagnosed.
Frequently Asked Questions (FAQ)
Can I use a magnetic mount or metal plate with my OBU cover?
No, you should avoid using magnetic mounts or metal plates near your OBU. Metal plates and strong magnetic fields act as physical barriers to radio waves, reflecting and absorbing the microwave and GNSS signals required for ERP transactions. Unless explicitly approved and supplied by the OBU manufacturer, using magnetic mounting systems can lead to consistent transaction failures and administrative fines.
Will an OBU cover protect the device from sun damage?
Yes, a high-quality, UV-resistant silicone or plastic cover can protect the OBU’s outer casing from discoloration, cracking, and cosmetic degradation caused by intense tropical sunlight. However, the cover must never block the device’s built-in ventilation slots. Restricting airflow can trap heat inside the unit, leading to internal component overheating, screen malfunction, or permanent hardware failure.
Community discussion
Share your experience or ask a question. Comments are reviewed before publication.