
Installing a car speaker box requires careful physical mounting and precise electrical wiring to ensure optimal sound quality and passenger safety. A loose enclosure can become a dangerous projectile during sudden stops, while improper wiring can lead to short circuits, blown fuses, or damage to your vehicle’s electrical system. By planning your layout, securing the enclosure with robust hardware, and routing your cables away from interference sources, you can achieve a clean, reliable installation that preserves both your vehicle’s interior and its audio performance. If you are unfamiliar with automotive electrical systems or vehicle disassembly, consulting a qualified professional installer is highly recommended before beginning any physical modifications.
Pre-Installation Preparation and Safety Checks
Before handling any tools or purchasing installation accessories, you must establish a safe working environment and verify the physical limits of your vehicle. The primary safety boundary for any automotive electrical work begins with disconnecting the negative terminal of your vehicle’s battery. This simple step eliminates the risk of accidental short circuits, blown factory fuses, or damage to sensitive onboard computers while you route and connect new wiring. Always refer to your original-vehicle owner’s manual for specific instructions regarding battery disconnection, as some modern vehicles require specific procedures to preserve system memory or sensor calibrations.
Next, measure the physical dimensions of your speaker box and compare them against the available space in your trunk, cargo area, or cabin. Ensure you account not only for the outer dimensions of the enclosure but also for the depth required by the speaker cones during maximum excursion, as well as the space needed for cable connections and ventilation. Check that the proposed location does not block access to spare tires, fuse boxes, or emergency roadside kits.
Products mentioned in this guide
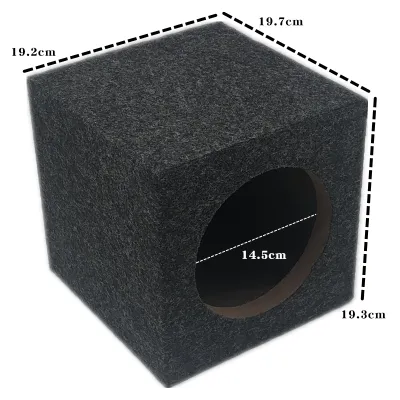




Prices are valid at publication and may change. Please refer to the product page for the latest price.
Gathering the correct tools and materials beforehand prevents rushed decisions and poor-quality connections during the installation process. You will need insulated hand tools, a high-quality wire stripper, a dedicated crimping tool, and heat shrink tubing to protect your connections. Avoid using household tools or makeshift cutting implements, which can damage wire strands and lead to premature connection failure under the stress of vehicle vibrations.
Finally, review the documentation provided by both your vehicle manufacturer and the speaker box manufacturer. These manuals contain critical warnings regarding structural limits, airbag deployment zones, and electrical load capacities. If your vehicle features advanced safety systems or complex hybrid/electric drivetrains, professional installation is often necessary to avoid interfering with high-voltage lines or sensitive safety sensors.
Securing the Speaker Box: Mounting Best Practices
A speaker box must be firmly anchored to the vehicle’s chassis to prevent physical movement during transit. In a sudden braking event or collision, an unsecured enclosure can shift violently, causing severe damage to the vehicle’s interior, tearing electrical connections, or injuring passengers. When selecting a mounting location, ensure the enclosure does not obstruct safety equipment, such as side-curtain airbags, seatbelt pretensioners, or cargo tie-down points.

To secure the box, use heavy-duty mounting brackets, L-brackets, or specialized cargo straps designed for automotive applications. Fasten these brackets directly to a solid structural point of the vehicle, such as the metal trunk floor or a reinforced cargo panel. Before drilling any holes for mounting screws, thoroughly inspect the area beneath and behind the drilling surface to ensure you will not puncture the fuel tank, brake lines, electrical harnesses, or suspension components.
Vibration-damping materials play a crucial role in preserving sound quality and preventing annoying rattles. Applying automotive-grade butyl rubber damping sheets to the mounting surface and the contact points of the speaker box helps isolate physical vibrations. This treatment prevents the metal panels of your vehicle from acting as secondary resonators, which can muddy the bass response and create distracting mechanical noises.
For custom or semi-custom enclosures, maintaining structural integrity and a complete seal is essential for proper acoustic performance. Ensure all joints of the speaker box are sealed with high-quality wood glue or silicone sealant to prevent air leaks, which degrade bass response and can cause mechanical strain on the speaker drivers. When mounting the speakers into the box, tighten the mounting screws in a star pattern to distribute pressure evenly, taking care not to over-tighten them, which can strip the wood threads or crack the plastic housing of the enclosure.
Wiring the Speaker Box Correctly
Proper cable routing and connection techniques are vital for maintaining signal integrity and preventing electrical hazards. When running wires from your amplifier or head unit to the speaker box, always separate the high-current power cables from the low-level audio signal cables, such as RCA interconnects. Running power and signal cables parallel to each other along the same side of the vehicle can introduce electromagnetic interference, resulting in persistent engine whine or static through your speakers. Route power cables down one side of the cabin and signal cables down the opposite side.
Every electrical connection must be thoroughly insulated to prevent short circuits against the vehicle’s metal chassis. Use high-quality heat shrink tubing or automotive-grade electrical tape to cover all exposed wire ends, splices, and terminal connections. Avoid using wire nuts or simple twist-and-tape methods, as these are prone to loosening over time due to constant road vibrations and temperature fluctuations within the cabin.
Establishing a reliable ground connection is one of the most critical aspects of car audio installation. If you are grounding an external amplifier that powers your speaker box, the ground wire must connect to a bare metal point on the vehicle’s chassis. Clean the chosen contact point thoroughly using sandpaper or a wire brush to remove all paint, rust, primer, and dirt, ensuring a shiny, metal-to-metal connection. Secure the ground terminal using a self-tapping screw or bolt with a star washer to prevent the connection from vibrating loose.
When connecting the speaker wires to the terminal cup of the speaker box, pay close attention to the polarity of the connections. Match the positive terminal of the amplifier or head unit to the positive terminal of the speaker box, and repeat the process for the negative terminals. Reversing the polarity on one channel causes the speakers to move out of phase with each other, resulting in acoustic cancellation that severely diminishes bass output and ruins the stereo image.
Common Mistakes to Avoid During Installation
One of the most frequent errors in DIY car audio installations is using undersized speaker or power wires. Wire gauge must be selected based on the current draw of your audio system and the length of the cable run. Using wire that is too thin introduces high electrical resistance, leading to significant voltage drops, reduced audio performance, and excessive heat generation that can melt insulation and pose a fire hazard. Always consult a wire gauge chart to select the appropriate American Wire Gauge (AWG) for your system’s power requirements.
Poor grounding remains a leading cause of system noise and equipment failure. A weak ground connection creates high resistance, which can cause ground loops, alternator whine, and static. If your amplifier’s ground wire is too long, attached to a painted surface, or secured to a loose body panel rather than the main chassis, the system will not perform reliably and may shut down unexpectedly under heavy loads. Keep ground wires as short as possible, ideally under one meter in length.
Omitting an inline fuse on the main power cable near the battery is a critical safety oversight that must be avoided. The primary purpose of this fuse is to protect the vehicle from a catastrophic fire if the power cable chafes against metal and shorts to the chassis. The inline fuse holder must be installed on the positive power cable within 30 to 45 centimeters of the battery terminal, before the wire passes through any metal firewalls or structural panels.
Neglecting moisture protection can quickly ruin your speaker box and drivers, especially in regions with high humidity or frequent rain. If you are mounting speakers in doors or areas prone to water intrusion, use foam speaker baffles or protective rain shields to divert water away from the speaker cones and terminals. For trunk-mounted enclosures, ensure the trunk seals are intact and that the box is elevated slightly off the floor if the area is prone to dampness or condensation.
Post-Installation Testing and Troubleshooting
Before reconnecting your vehicle’s battery, perform a thorough visual and physical inspection of the entire installation. Double-check that all mounting brackets are secure, no wires are pinched under seats or trim panels, and all electrical connections are fully insulated. Ensure that no loose tools, wire clippings, or metal debris remain near the battery or amplifier terminals, as these can cause immediate short circuits when power is restored.
Once you reconnect the negative battery terminal, turn on your audio system at a very low volume level to perform initial functional tests. Listen closely to each speaker to verify that sound is playing from the correct channels and that there is no audible distortion, static, or popping. Adjust the balance and fader controls on your head unit to confirm that the left, right, front, and rear channels are routed correctly and operating in phase.
If you detect physical rattling or buzzing noises when you gradually increase the volume, temporarily pause the test to locate the source. Gently press on various interior trim panels, the speaker box itself, and nearby cargo items to identify what is vibrating. You can resolve most physical rattles by adding foam tape, felt pads, or additional damping material between the vibrating surfaces.
If you encounter persistent electrical noise, such as a high-pitched whine that changes pitch with engine speed, turn off the system immediately. This symptom typically points to a ground loop or poorly routed signal cables. Re-verify your ground connection point and ensure your RCA cables are not running alongside main power lines. If basic troubleshooting does not resolve the issue, or if you experience recurring blown fuses or amplifier protection mode triggers, stop operating the system and consult a qualified car audio technician to prevent permanent damage to your vehicle’s electronics.
Frequently Asked Questions (FAQ)
Can I use standard household speaker wire for my car speaker box?
Standard household speaker wire is not designed to withstand the harsh environmental conditions of an automotive cabin. Vehicles experience extreme temperature swings, high humidity, and exposure to automotive chemicals like oil, fuel, and cleaning solvents, which can rapidly degrade the basic PVC insulation used on household wires. Additionally, household wire often features fewer, thicker copper strands, making it stiff and prone to cracking or breaking under the constant vibrations of daily driving. Automotive-grade speaker wire utilizes highly flexible, multi-strand conductors and durable, chemical-resistant insulation designed specifically to endure the physical stresses of a moving vehicle.
Do I need to add an amplifier when installing a new speaker box?
Whether you need an external amplifier depends on the power requirements of your new speaker box and the output capabilities of your existing head unit. Most factory or aftermarket head units provide limited power, typically ranging from 15 to 22 watts RMS per channel, which is often insufficient to drive larger speaker boxes or subwoofers effectively. If the RMS power rating of your speaker box is significantly higher than your head unit’s output, attempting to drive it directly can result in severe audio clipping and distortion at moderate volumes, which can overheat and permanently damage the speaker voice coils. For optimal performance and clarity, match the speaker box’s RMS power rating with an amplifier capable of delivering clean, matching power.
Community discussion
Share your experience or ask a question. Comments are reviewed before publication.